Quickstart SvelteKit

Intro
This example will show you how to build a simple user management app from scratch using Kontenbase and SvelteKit. Before begin make sure that you are familiar with SvelteKit basics.
This also includes:
- Kontenbase Database: to store data, such as users and profiles.
- Kontenbase SDK: this will make easier to handle auth and service features.
- Kontenbase Authentication & Authorization: users can sign in with username and password.
- Kontenbase Storage: users can upload a photo.
By the end, you'll have an application that is able to register a new user, login and update some basic profile details.
Project Set up
Before we start building we're going to set up our Database and get the API KEY.
Create a Project
- Go to app.kontenbase.com
- Click on
Create Projectbutton. - Enter your project details.
- Wait for the new project to launch.
Set up the Database Service
Now we are going to set profile and Users service.
- Click on
Create New Servicebutton. - Fill in the service detail, give a name
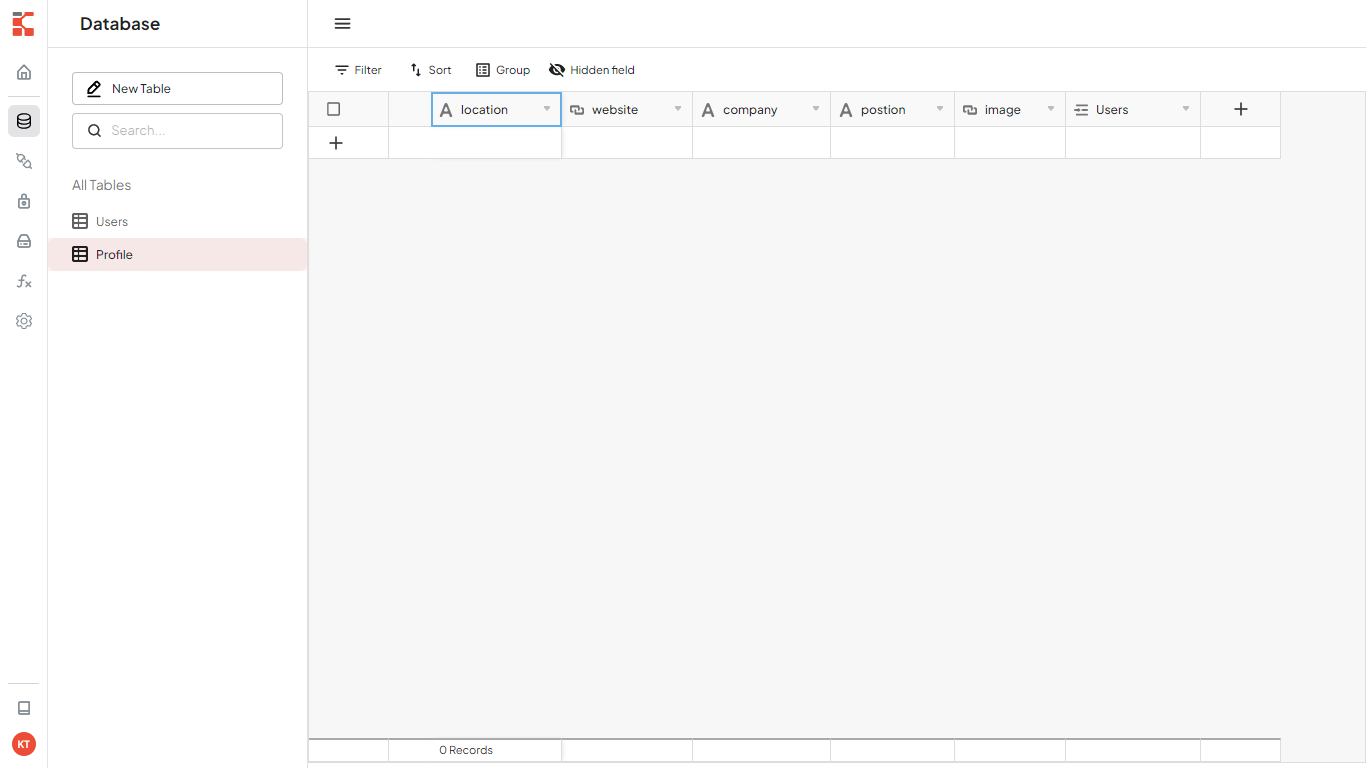
profile, select as private. - Click on
profileservice, selectCustomize Fields, then add some fields following picture below. note, there is a fieldUserswith data typeLink To Record. It means we create a data relation between the serviceprofilewith theUsers.
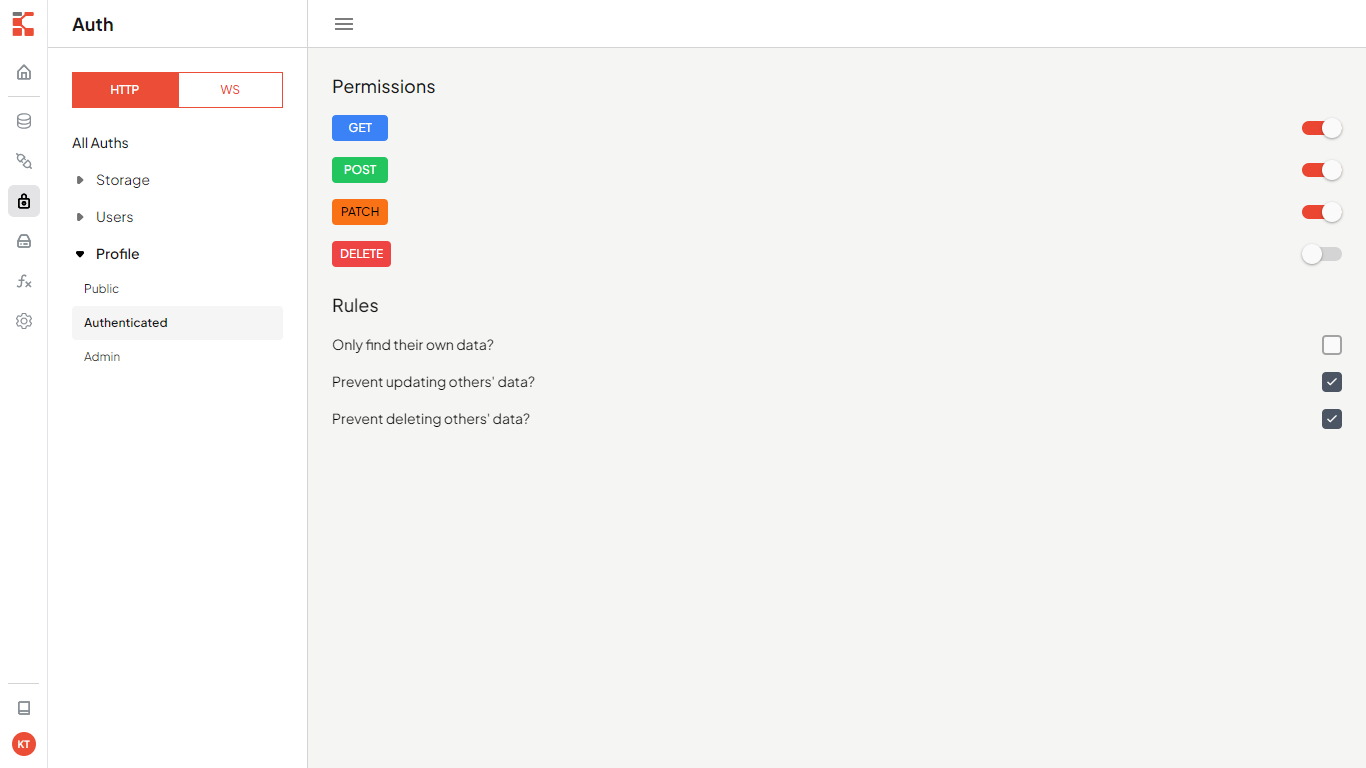
We need some configuration in Users service to make both autheticated user and public can get or access users data. But don't worry, by default that will not return password, so user still secure.
- Click on
Authorizationbutton. - Change service to
Usersand turn onGETpermission for role autheticated and public.
- Add new field called :
username, select data type :username, then set field as required and unique. - Enable username as user identity when logging in: click
Settings, thenConfigurationon the sidebar, findUser identity fieldand change to username.
Get the API KEY
- Go to the
Settings. - Click
APIon the sidebar. - Find your API KEY in this page.
Building the App
Initialize a Svelte App
We can use the SvelteKit Skeleton Project to initialize an app called kontenbase-sveltekit (for this tutorial you do not need TypeScript, ESLint, Prettier, or Playwright):
npm create svelte@latest kontenbase-sveltekit
cd kontenbase-sveltekit
npm install
Let's install Kontenbase SDK, simply use the command below:
npm install @kontenbase/sdk
Save the API KEY to environment variable in a .env that you copied earlier.
VITE_SVELTE_APP_KONTENBASE_API_KEY=YOUR_KONTENBASE_API_KEY
Once that is done, let's create a helper file to initialize the Kontenbase Client and configure your SDK with the API KEY:
import { createClient } from '@kontenbase/sdk';

export const kontenbase = createClient({
  apiKey: import.meta.env.VITE_SVELTE_APP_KONTENBASE_API_KEY,
});
An optional step is updating the CSS file to make the App look nice. create global.css inside src folder and copy the css code that we have provided below:
@import url('https://fonts.googleapis.com/css2?family=Rubik:wght@300;400;500;600;700&display=swap');

* {
  margin: 0;
  padding: 0;
  box-sizing: border-box;
  font-family: 'Rubik', sans-serif;
}
a {
  text-decoration: none;
}
button,
.button {
  color: black;
  background-color: transparent;
  border: none;
  padding: 8px 12px;
  font-size: 16px;
  cursor: pointer;
}
.button-ouline {
  border: 1px solid gainsboro;
}
.button-primary {
  background-color: black;
  color: white;
}
.auth-page {
  margin: 0 auto;
  width: 560px;
  padding: 14px;
}
.auth-button {
  text-align: right;
  margin-bottom: 16px;
}
.auth-page h2 {
  text-align: center;
}
.form-group {
  margin-bottom: 12px;
  font-size: 16px;
}
.form-group label {
  display: block;
  margin-bottom: 4px;
  font-weight: 500;
  font-size: 16px;
  text-align: left;
}
.form-group input {
  padding: 8px 12px;
  width: 100%;
  font-size: 16px;
}
.form-button {
  text-align: right;
}
.profile-page {
  margin: 0 auto;
  width: 560px;
}
.profile-wrapper {
  background-color: black;
  padding: 14px;
  color: white;
}
.profile-header {
  text-align: center;
  padding: 24px 0;
}
.profile-title {
  margin: 8px 0;
  font-size: 24px;
  font-weight: 600;
  text-transform: capitalize;
}
.image-avatar {
  border-radius: 50px;
}
.card {
  background-color: white;
  color: black;
  border-radius: 2px;
  padding: 14px;
}
.card:not(:last-child) {
  margin-bottom: 12px;
}
.card h3 {
  font-weight: 500;
  margin-bottom: 24px;
}
.card-field:not(:last-child) {
  margin-bottom: 12px;
}
.card-field input {
  font-size: 16px;
}
.card span,
.card label {
  display: block;
  font-size: 14px;
  color: gray;
  margin-bottom: 4px;
}
.card input {
  display: block;
  font-family: 16px;
  padding: 8px 8px 8px 0;
  color: black;
  width: 100%;
  border: none;
  border-bottom: 1px solid gainsboro;
  outline: none;
}
.website-link {
  text-decoration: none;
  color: black;
}
.logout-button {
  text-align: end;
}
input[type='file'] {
  display: none;
}
.label-file {
  display: flex;
  flex-direction: column;
  align-items: center;
  margin-top: 2px;
  cursor: pointer;
}
.label-file span {
  margin-top: 10px;
}
.button-top {
  display: flex;
  justify-content: space-between;
}
.link-email {
  text-decoration: none;
  color: black;
}
create file __layout.svelte inside the routes folder, then copy the code below. This to connect our globals.css file with the App.
<script>
  import '../global.css';
</script>

<slot />
Set up Login and Register Components
Let's set up the svelteKit components to manage login and register. We'll use username and password to login.
Create a folder inside the src which will be called components, then create login.svelte and register.svelte file inside the components folder and copy the code below in each files.
<script>
  import { goto } from '$app/navigation';
  import { kontenbase } from '../lib/kontenbase';

  let username;
  let password;

  const handleLogin = async () => {
    const { error, token } = await kontenbase.auth.login({
      username,
      password,
    });

    if (error) {
      alert(error.message);
      return;
    }
    if (token) {
      goto('/profile');
    }
  };
</script>

<form on:submit|preventDefault={handleLogin}>
  <div class="form-group">
    <label for="username">Username</label>
    <input
      type="text"
      id="username"
      name="username"
      required
      bind:value={username}
    />
  </div>
  <div class="form-group">
    <label for="password">Password</label>
    <input
      type="password"
      id="password"
      name="password"
      required
      bind:value={password}
    />
  </div>
  <div class="form-button">
    <button type="submit" class="button button-primary">Submit</button>
  </div>
</form>
<script>
  import { goto } from '$app/navigation';
  import { kontenbase } from '../lib/kontenbase';

  let firstName;
  let lastName;
  let username;
  let email;
  let password;

  const handleRegister = async () => {
    const { user, error } = await kontenbase.auth.register({
      firstName,
      lastName,
      username,
      email,
      password,
    });

    if (error) {
      alert(error.message);
      return;
    }

    const { error: ErrorProfile } = await kontenbase.service('profile').create({
      Users: [user._id],
    });

    if (ErrorProfile) {
      alert(ErrorProfile.message);
      return;
    }

    goto('/profile');
  };
</script>

<form on:submit|preventDefault={handleRegister}>
  <div class="form-group">
    <label for="firstname">First Name</label>
    <input
      type="text"
      id="firstname"
      name="firstname"
      required
      bind:value={firstName}
    />
  </div>
  <div class="form-group">
    <label for="lastname">Last Name</label>
    <input type="text" id="lastname" name="lastname" bind:value={lastName} />
  </div>
  <div class="form-group">
    <label for="username">Username</label>
    <input
      type="text"
      id="username"
      name="username"
      required
      bind:value={username}
    />
  </div>
  <div class="form-group">
    <label for="email">Email</label>
    <input type="email" id="email" name="email" required bind:value={email} />
  </div>
  <div class="form-group">
    <label for="password">Password</label>
    <input
      type="password"
      id="password"
      name="password"
      required
      bind:value={password}
    />
  </div>
  <div class="form-button">
    <button type="submit" class="button button-primary">Submit</button>
  </div>
</form>
Find index.svelte and copy the code below to import Login and Register components:
<script>
  import Login from '../components/login.svelte';
  import Register from '../components/register.svelte';

  let switchAuthForm = 'login';

  const handleSwitchloginForm = () => {
    switchAuthForm = 'login';
  };

  const handleSwitchRegisterForm = () => {
    switchAuthForm = 'register';
  };
</script>

<div class="auth-page">
  <div class="auth-button">
    <button on:click={handleSwitchloginForm}>Login</button>
    <button on:click={handleSwitchRegisterForm}>Register</button>
    <div>
      {#if switchAuthForm === 'login'}
        <Login />
      {:else}
        <Register />
      {/if}
    </div>
  </div>
</div>
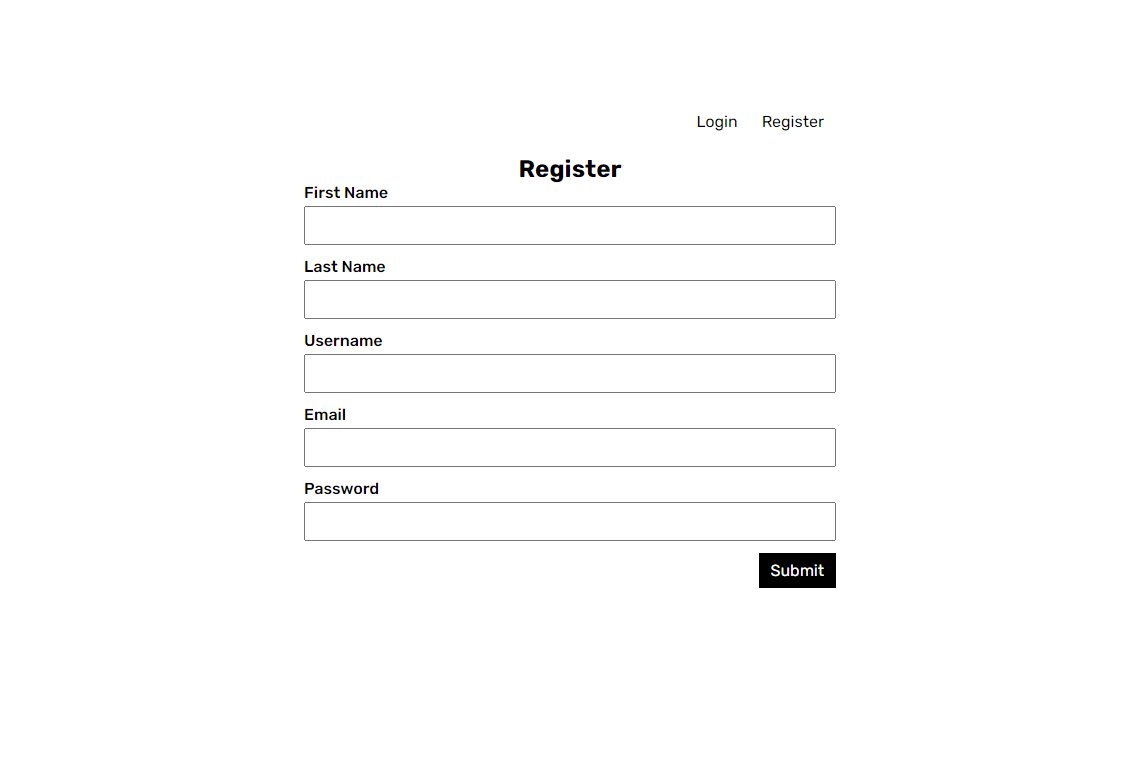
If we launch the App after doing the steps above, We'll see this page show:
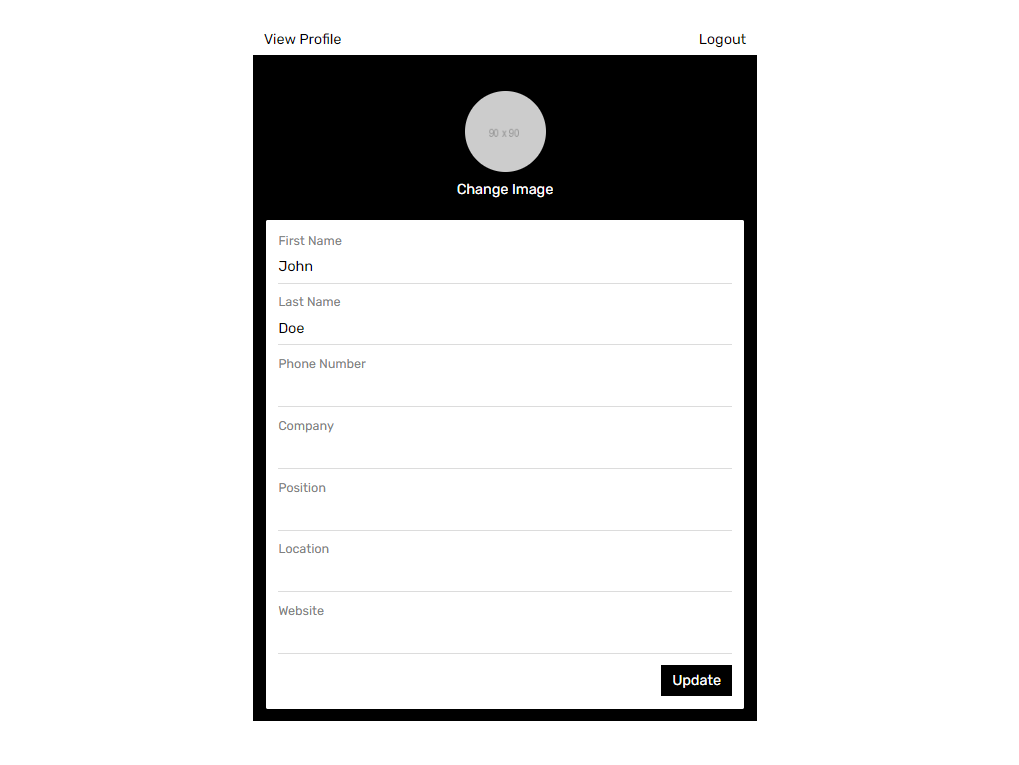
Set up Profile Page
To view and edit our profile, let's create profile.svelte file inside the routes folder, then copy the code below:
<script>
  import { onMount } from 'svelte';
  import { goto } from '$app/navigation';
  import { kontenbase } from '../lib/kontenbase';

  let firstName;
  let lastName;
  let username;
  let profileId;
  let phoneNumber;
  let image;
  let company;
  let position;
  let location;
  let website;
  let loading;
  let files;

  const getProfile = async () => {
    const { user, error } = await kontenbase.auth.user({
      lookup: '*',
    });

    if (error) {
      console.log(error);
      return;
    }

    if (user) {
      const profile = user?.profile?.[0];
      firstName = user.firstName;
      lastName = user.lastName;
      phoneNumber = user.phoneNumber;
      username = user.username;
      profileId = profile._id;
      image = profile.image;
      company = profile.company;
      location = profile.location;
      position = profile.position;
      website = profile.website;
    }
  };

  const handleChangeImage = async () => {
    loading = true;
    const { data, error: uploadError } = await kontenbase.storage.upload(
      files[0]
    );

    const { error: updateError } = await kontenbase
      .service('profile')
      .updateById(profileId, {
        image: data?.url,
      });

    if (uploadError || updateError) {
      alert('Failed to change image profile');
      return;
    }

    image = data?.url;
    loading = false;
  };

  const handleUpdate = async () => {
    const { error: userError } = await kontenbase.auth.update({
      lastName,
      firstName,
      phoneNumber,
    });
    const { error: profileError } = await kontenbase
      .service('profile')
      .updateById(profileId, {
        company,
        location,
        position,
        website,
      });

    if (userError || profileError) {
      console.log(userError, profileError);
      alert('Failed to update profile');
    } else {
      alert('Profile updated!');
    }
  };

  const handleLogout = async () => {
    const { error } = await kontenbase.auth.logout();

    if (error) {
      console.log(error);
      return;
    }

    goto('/');
  };

  onMount(() => {
    getProfile();
  });
</script>

<div class="profile-page">
  <div class="button-top">
    <a class="button" href={username}>View Profile</a>
    <button on:click={handleLogout}>Logout</button>
  </div>
  <div class="profile-wrapper">
    <div class="profile-header">
      <label class="label-file" for="file">
        <img
          class="image-avatar"
          width="90"
          height="90"
          src={image || 'https://via.placeholder.com/90'}
          alt=""
        />
        {#if loading}
          <span v-if="loading">Uploading...</span>
        {:else}
          <span v-else="loading">Change Image</span>
        {/if}
      </label>
      <input
        name="file"
        id="file"
        type="file"
        accept="image/*"
        bind:files
        on:change={handleChangeImage}
      />
    </div>
    <div class="card">
      <form on:submit|preventDefault={handleUpdate}>
        <div class="card-field">
          <label for="firstname">First Name</label>
          <input
            type="text"
            id="firstname"
            name="firstname"
            bind:value={firstName}
          />
        </div>
        <div class="card-field">
          <label for="lastname">Last Name</label>
          <input
            type="text"
            id="lastname"
            name="lastname"
            bind:value={lastName}
          />
        </div>
        <div class="card-field">
          <label for="phonenumber">Phone Number</label>
          <input
            type="text"
            id="phonenumber"
            name="phonenumber"
            bind:value={phoneNumber}
          />
        </div>
        <div class="card-field">
          <label for="company">Company</label>
          <input type="text" id="company" name="company" bind:value={company} />
        </div>
        <div class="card-field">
          <label for="position">Position</label>
          <input
            type="text"
            id="position"
            name="position"
            bind:value={position}
          />
        </div>
        <div class="card-field">
          <label for="location">Location</label>
          <input
            type="text"
            id="location"
            name="location"
            bind:value={location}
          />
        </div>
        <div class="card-field">
          <label for="website">Website</label>
          <input type="url" id="website" name="website" bind:value={website} />
        </div>
        <div class="form-button">
          <button type="submit" class="button button-primary">Update</button>
        </div>
      </form>
    </div>
  </div>
</div>
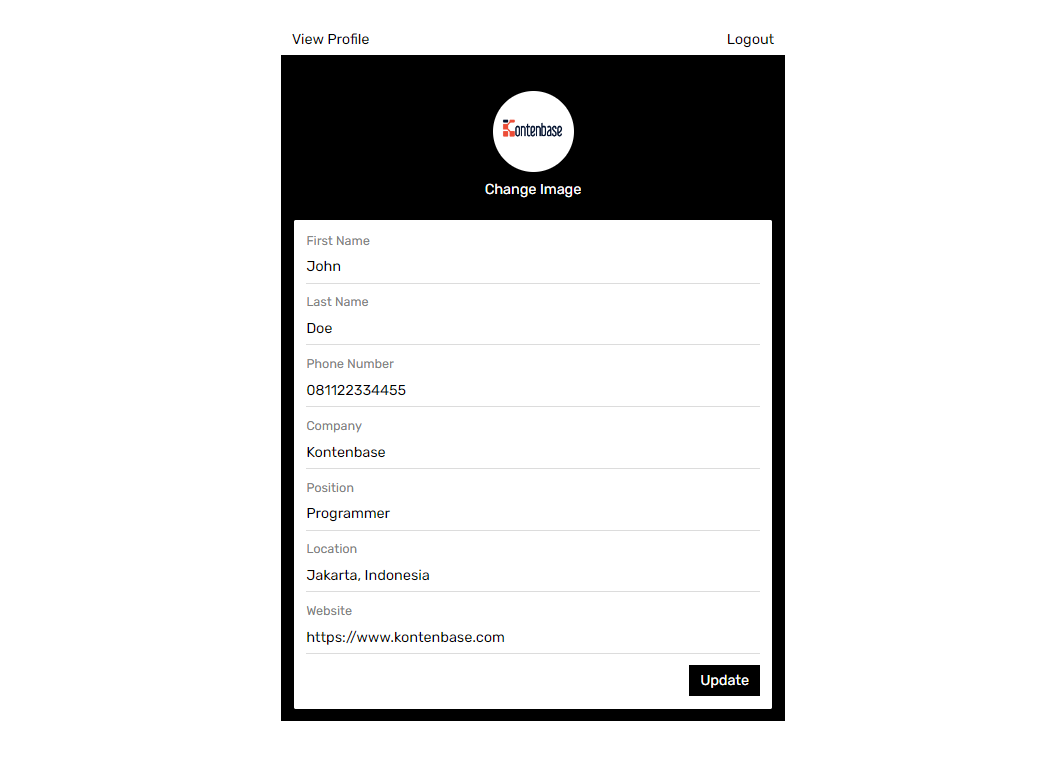
If we register or login successfully we should be navigated to profile page. In this page we will able to edit profile and upload a picture.
Set up View Profile Based on the Username
Now we will create a page to show user profile based on the username defined in the URL. Example when user visit: app_url/johndoe,
this page will show user profile with username johndoe.
Create [username].svelte file inside the routes folder, Copy the code below:
<script>
  import { onMount } from 'svelte';
  import { goto } from '$app/navigation';
  import { kontenbase } from '../lib/kontenbase';
  import { page } from '$app/stores';

  const { username } = $page.params;
  let firstName;
  let lastName;
  let phoneNumber;
  let email;
  let profileId;
  let image;
  let company;
  let position;
  let location;
  let website;
  let isOwnProfile = false;

  const getProfile = async () => {
    if (!username) {
      return;
    }

    const { data, error } = await kontenbase.service('Users').find({
      where: {
        username,
      },
      lookup: '*',
    });

    if (error) {
      console.log(error);
      return;
    }

    if (data) {
      const user = data?.[0];
      const profile = user?.profile?.[0];
      firstName = user.firstName;
      lastName = user.lastName;
      phoneNumber = user.phoneNumber;
      email = user.email;
      profileId = profile._id;
      image = profile.image;
      company = profile.company;
      location = profile.location;
      position = profile.position;
      website = profile.website;

      const { user: authUser } = await kontenbase.auth.user();

      isOwnProfile = user.username === authUser?.username;
    }
  };

  const handleLogout = async () => {
    const { error } = await kontenbase.auth.logout();

    if (error) {
      console.log(error);
      return;
    }

    goto('/');
  };

  onMount(() => {
    getProfile();
  });
</script>

<div class="profile-page">
  {#if isOwnProfile}
    <div class="button-top">
      <a href="/profile" class="button">Edit Profile</a>
      <button on:click={handleLogout}>Logout</button>
    </div>
  {/if}
  <div class="profile-wrapper">
    <div class="profile-header">
      <img
        class="image-avatar"
        width="90"
        height="90"
        src={image || 'https://via.placeholder.com/90'}
        alt=""
      />
      <h3 class="profile-title">
        <span>{firstName}</span> <span>{lastName}</span>
      </h3>
      <p>{position || 'position is null'}</p>
    </div>
    <div class="card">
      <h3>Contact</h3>
      <div class="card-field">
        <span>Name</span>
        <p>{firstName} {lastName}</p>
      </div>
      <div class="card-field">
        <span>Mobile</span>
        <p>{phoneNumber || 'phone number is null'}</p>
      </div>
      <div class="card-field">
        <span>Email</span>
        <a class="link-email" href="'mailto:' + email">
          {email || 'email is null'}
        </a>
      </div>
      <div class="card-field">
        <span>Company</span>
        <p>{company || 'company is null'}</p>
      </div>
    </div>
    <div class="card">
      <h3>Location</h3>
      <p>{location || 'location is null'}</p>
    </div>
    <div class="card">
      <h3>Web Links</h3>
      <a class="website-link" href={website || ''}> Website </a>
    </div>
  </div>
</div>
And we're done to complete our App!